DIY Photography Season by Season - Part 4: How to take great photos of your kids in winter
Jingle bells, jingle bells, jingle all the way! Winter is upon us and Christmas is just around the corner. While here in the UK it might be dark and grey most of the time winter is a beautiful time of year to take family photographs - think snowy landscapes, Christmas lights and the warm glow of cosy fireside evenings. Yes it’s time for my winter photography guide. So stop and take a few moments break from the Christmas rush, and get ready to take some great festive photos of your family. I love looking back at photos of my girls at Christmas to see how much they’ve grown and changed, it’s a great way to mark the passing of each year - and shed a tear about how quickly they are growing up!
This guide is the fourth in a seasonal series I’ve put together because parents are always asking me for advice about how to get the best pictures of their kids. So in these DIY Photography guides I aim to help you take well-prepared, thoughtfully composed, colour coordinated shots yourself.
Follow my tips and you won’t have to wait until you can get a session with me to capture those special moments. If you want to learn more then you can always join me on my next Photography for Parents Workshop.
First and foremost be prepared
- The first thing to remember about winter is that the days, at least here in the UK, are much shorter. The sun rises late and sets early so there’s a limited window of opportunity where the natural light will be bright enough to take great pictures.
- If you’re shooting outside dress warmly and take some gloves so that when you’re not shooting you can slip them on to warm up your fingers.
- The cold eats your battery life faster than normal so make sure the batteries for all your equipment are fully charged - that includes your mobile phone. Bring a spare battery for your camera and keep it warm by keeping it close to your body.
How to photograph in the snow
We’ve already had a flurry snow here in Surrey, so if and when you wake up to find the outside world blanketed white, here are few tips to get great photo of your kids as they sledge, throw snowballs and make snowmen. While it make look crisp, white and beautiful to the naked eye, your camera often doesn’t see it that way. Many photos of snow end up with a blue tint, or with snow that looks more grey than white. The problem is all that white fluffy snow is very reflective. Any light there is will be reflected off it which, on the plus side, makes exposure more consistent throughout the shot. But unfortunately it also confuses the camera’s metering system which will then underexpose images. How to fix this; use your camera's exposure compensation feature or a manual exposure mode. This will enable you to force an additional 1 to 2 stops of light to reach your film or CCD.


If you have a point and shoot camera or a compact digicam, you may not have manual exposure but it is likely to have the exposure compensation option. Look for a little +1 or +2 symbol. If you have a film or digital SLR camera, you should have an exposure compensation option which would help you in TV or AV (canon) mode as well as of course the full breath of using a manual exposure mode. If you are still unsure how to use these settings on your camera please sign-up for my Photography for Parents Workshop to get some more hands-on experience.
- Increase your ISO. On higher ISO setting your camera needs less light to take a photo. This means you can avoid blinding people with your flash, but it can make your images look grainy. Luckily, most modern cameras can cope with ISO settings as high as 3200 or even 6400.
- Use the snowy/sandy F22 rule. On a bright day in snowy or sandy conditions change your aperture to F22. Then you can use any shutter speed or ISO speed as long as they are the exact inverse of one another.
So for example: you’re watching your kids throw snowballs on a crisp, bright winter morning, and you decide 1/100s is the best shutter speed to use. With your aperture set to F22 all you need to do now is set your ISO speed to 100, the inverse of the 1/100 shutter speed. Here’s a quick table of matching ISO speed and shutter speed values to use with these rules:
- ISO 100 with Shutter speed 1/100s
- ISO 200 with Shutter speed 1/200s
- ISO 400 with Shutter speed 1/400s
- ISO 800 with Shutter speed 1/800s
There other rules like this for other winter conditions you might encounter:
- The overcast F/8 rule
- The slightly overcast F/11 rule
- The heavy overcast F/5.6 rule
- The sunset F/4 rule
For example: the kids are just putting the carrot nose on their snowman when the sun disappears behind a cloud. You set your aperture to F11, and pick a shutter speed of 1/800s with an ISO speed of 800 because you want to freeze the action. The problem with these rules is that you sacrifice control over your aperture. Being able to control your aperture lets you decide how much of the scene is in focus, something that, if you’ve been following my guides you’ll know, is very important when photographing children.
There is a way around this. Every time you increase your aperture by one full F-stop, you can decrease your shutter speed by one full stop, and you’ll get exactly the same exposure.
For example: let’s say you shooting on a slightly overcast day so you started with an aperture of F11, a with a shutter speed of 1/200 and the matching ISO of 200. You decide you want to shoot at F4.8 which means you’ve gone down 8 stops - the number of times you rotated your wheel to get from F11 to F4.8. To keep the same exposure you will need to increase your shutter speed by 8 stops to 1/1250. If you are still unsure how to use these settings on your camera please sign-up for my Photography for Parents Workshop to get some more hands-on experience.
It’s beginning to feel a lot like Christmas
No winter guide would be complete without a few tips to help you get some great photos of the biggest day of the year - Christmas. Chances are that usually all you’ve got to show for the day are a few rushed shots of the kids opening their presents, and the family around the dinner table tucking into their turkey. So I’ve put together these quick tips to help you capture the true atmosphere of your family festivities so you’ve got some great memories to look back on in years to come.
1.Make the most of any natural light - We’ve already covered the fact that natural light is in short supply at this time of year, but where possible it’s always better than the artificial lights inside. You’ll also do yourself a favour if you turn the built-in flash on your camera off. So on Christmas morning get your children to open some of their presents on in front of a big window that lets in plenty of the morning light. I say ‘some of their presents’ because if your kids are anything like mine it will still be dark when they wake up to see if Santa has been! If that’s the case hold few presents back for later when the sun’s up! Better still go outside. If there’s snow on Christmas day, then this goes without saying. A family Christmas portrait of you all enjoying a wintery walk will not only look more natural than you all posed in front of the Christmas tree, or around the dinner table, but the light is more flattering too.
And if you really want to take a beautiful family photo try and dress the family in a colour that are balanced, for the winter this generally means incorporating a splash of bold colours such as blue, yellows or reds. A combination of beautiful whites, grey and brown tones can look beautiful too. These colours will give your images a great winter feel and will compliment your surroundings beautifully. I have put a Pinterest board together with some examples which I hope you find helpful.
Layers work very well for photography in general but has the added bonus for outdoor photography that you can take them off and put them on depending on the weather. Try to choose items of clothing without any large logos or text as this can be distracting from the image and my personal preference is not to wear any watches.
2. Don’t miss the details - As I’ve said in a couple of the other guiles, family photos aren’t only about smiling faces. Lovely as they are an album full of them gets a bit dull.
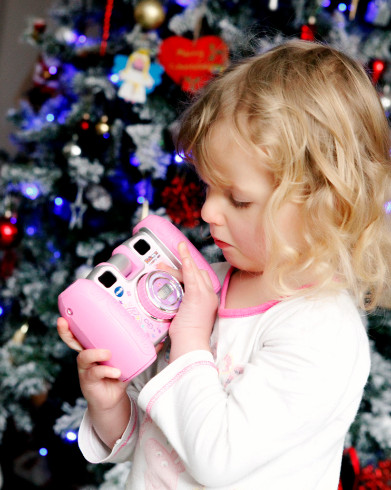
Capture the details of the day such as a card your child made for you at school, or the bauble for the tree they made out of a fir cone. It’s touching details such as these that are often overlooked and will enrich your memories in years to come. Close ups the lights and branches of the Christmas tree work well too.

3. Get some more formal family shots - Make the most of having everyone together to get a family portrait that would make a lovely gift for grandparents or other relatives.
We’ve already established that it’s best to do this outside, but inside or out here are a few guidelines:
- Word from the wise! It’s usually a good idea to take photos like this at the start of the day when everyone is still pleased to see one another and no-one is the worse for wear after a sherry or three!
- Make the shot more interesting by creating a festive backdrop using Christmas lights, festive wreaths, and of course your beautifully festooned tree. Sit your subjects a couple of feet in front of your backdrop so you can get a beautifully blurred background by choosing a lower aperture setting.
- Don’t just put the tallest family members at the back of the group, also put them in the middle, with smaller people on the edges.
- Keep the distance between the people at the front and the people at the back as short as possible to help keep everyone in focus.
- For big, deep group of people use a narrower aperture or elevate yourself - use a ladder or stand at the top of the stairs so you are looking down on the group to take the shot. You’ll fit in more people and get more faces in the shot.·
4. Ask everyone to ignore the camera - With the posed photos over and done with I suggest that for the rest of the time you ask everyone to do their best to ignore the camera so you can capture the day in a candid, unobtrusive way. Not only does it get a bit annoying if someone is constantly holding up proceedings by asking everyone to stop and pose, but the pictures don’t tell a story. Yes everyone’s smiling at the camera, but what were they doing, what games were they enjoying, or what joke had just been told? This style of photography is called ‘reportage’ and is great way to better convey the atmosphere of the day. So let the children play and watch what happens. Children come up with all sorts of fabulous imagination based games - and with all those new toys to try out for the first time their imaginations will run wild. Try not to intervene, just let them enjoy themselves and be poised to capture any special moments.

5. Use continuous mode for THE big moment of the day - Yes, I’m talking about present opening. The ritual of present opening is one fabulous photo opportunity after another. The full array of human emotions and facial expressions are on display - and that’s just from the adults! The kids will have faces full of p anticipation as they tear off the wrapping one moment, and bursting with joy the next. Switch your camera to continuous mode - sometimes called burst mode - at these times and you’ll get some brilliant photos of all the action, and the emotions, both of those receiving presents and those giving them.
6. Put the camera down and enjoy the day - So yes getting some great pictures of your family at Christmas is important, but far more important is that you are present. So it’s important for you to be part of the special moments as well as the one recording them. If you put some thought ahead of time to prepare the photos you want to take on the day, you’ll be able to get a fewer, but higher quality pictures, rather than hundreds of low quality snaps of the same thing. So put the camera down and enjoy the day, revel in your children’s delight and be there, in the moment.
7. Get in the picture - I’ve mentioned this before, but it’s easy to forget to get in the photos yourself. In years to come you will want to see yourself in your family photos as well as your gorgeous family. If you want a group shot of your whole family, this is where a tripod or steady surface and the self-timer setting on your camera comes in very handy! Or just pass the camera over to someone else to take a photo of you. I’ve got much better the last couple of years at getting in the photos with my girls, and now I have lots of great memories to look back on, like this one of me and my family. 
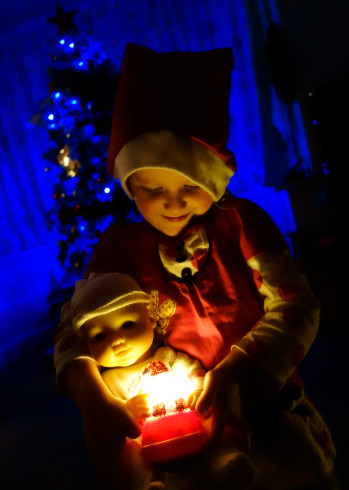
8. Get a shot of the tree - Doing a Christmas tree justice on film can be tricky because you need a very steady hand to take a decent photo at the slow shutter the low lighting demands. So this is how to do it:
- On a digital SLR, you need a high ISO and a slow shutter speed to allows more light to reach the sensor.
- Set your camera up on a tripod/chair or other firm surface and put it on self-timer mode.
- Frame your shot, choose your focus point, and press the shutter button half way to lock the focus and then all the way to start the timer.
A few words about white balance
White balance changes the colour balance in your pictures, to make it warmer or cooler depending on the light you’re shooting in.
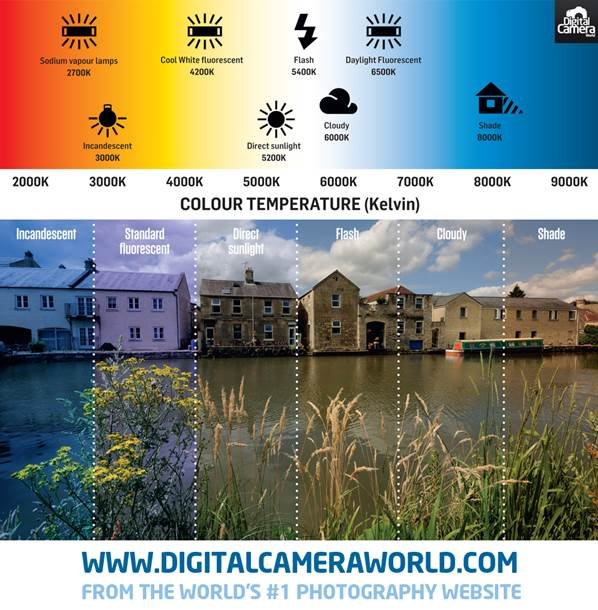
You probably don’t notice how different the light colours are in different conditions because our minds adapt very quickly to the perceive the colour of light as neutral, even whe it’s not.
A camera is less forgiving, it records colours exactly as they are. That’s why pictures taken under household lighting have an orange colour cast, and pictures taken at dusk or dawn have a cold, blue look.
Camera to work out the white balance automatically, and auto white balance systems in cameras these days are far better than they used to be. But they’re not perfect. For instance they often fail to correct the orange hue of artificial lighting strongly enough, or they correct colour when you don’t want them to. So most DSLRs come with white balance ‘presets’ tuned to provide a fixed correction for a range of common lighting scenarios. All you need to do is select the right one.
I like to use the flash setting for my white blance settings on most occasions (even when not using flash) as it gives me a nice warm tone which I like in my photos. Remember if you are not sure how to use your camera please sign-up for my Photography for Parents Workshop.
Of course if you really want to make it easy on yourself book one of my mini sessions and let me do all the hard work for you!
Hope you have found this helpful and I wish you a Very Merry Christmas and a Happy New Year!
Tamara